Sziasztok!
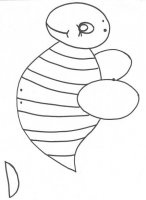
Teknősbékát szeretnék barkácsolni. Szeretnék ötleteket kérni.
Előre is köszönöm segítségeteket!
Noémi
[h=1]Sewing Tutorial: Turtle Pincushion {With Pattern}[/h]
◄ Back
Next ►
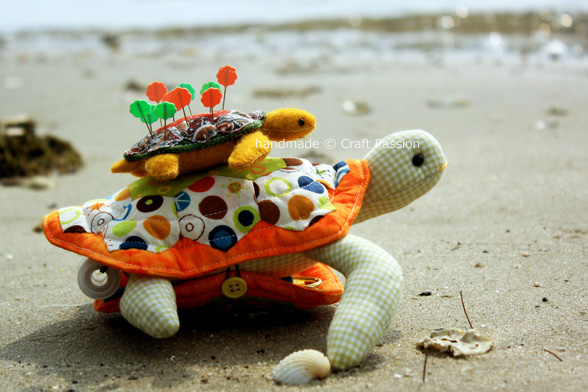
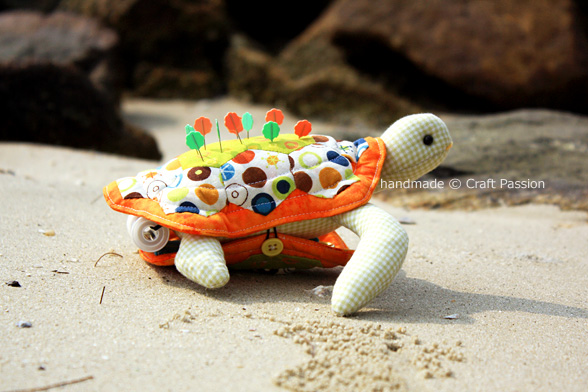
[h=3]Turtle PinCushion Combo - Carrying Greeny on top[/h]Picture 1 of 10 (Click "Next" for more pictures)
As written here a few weeks ago that I have a
new plan for
Greeny & Pinky – the turtle pincushion pattern, I keep my promise and make good of it….. ***drum roll**** Please welcome…..
COMBO Turtle Pincushion with Sewing Kit
There are compartments to keep scissor, thread and some sewing needles in a proper place [Click "
Next" on the photo browser above, picture 5 shows the compartments, or you can scroll down to see the step by step photos below]. It even has a pair of needle finding flippers.
This combo version is doubled the size of the original, but all you need to do is just enlarge the pattern to 200%. Quilters and sewers will find this Combo Turtle Pincushion very useful as it keeps the sewing essential together so it is mobile to bring it anywhere for your quilting project. You can also sew this as a soft toy or plush toy for kids, but you may want to replace the beaded eyes to embroidery eye for safety purpose. It can even be a fridge magnet to decorate your dining area, get a strong magnet for the body. I know there are a lot turtle lovers out there who collect various type of turtle as souvenir. Sew it for yourself or as a gift, I am sure you are going to have fun
Previously, I gave out the
Greeny & Pinky turtle pincushion pattern upon request. As Craft Passion’s traffic growing over the months so do the requests, I can no longer email it out manually, so…. I make it available for
free download here to save my time for other creations.
In this tutorial, there are 2 versions of turtle pincushions you can make:
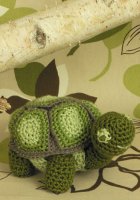
- To make a smaller felted body version of Greeny & Pinky, use the written instruction below.
- To make the Combo version as shown on the pictures above, use the step by step photos after the written instructions.Anyway, since they are inter-related, you can see the photos and instructions as reference too.
Before you proceed, please download the
pattern and check for the scale [2cm = 25/32"]. Don’t forget to enlarge it to 200% for COMBO version, when you use a ruler to measure the 2cm scale, it is in fact 4cm in reading.
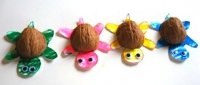
Oh, by the way if you would like to know where the scenery is…. I brought both turtles to the beautiful beach in Penang/Malaysia for photography, the experience was great!!! I found some “visitors” on the beach too….check them out by clicking the “Next” button on the photo browser!!!
~~~~~~~~~~~~~~~~~~~~~~~~~~~~~~~~~~~~~~~~~~~~~~~~~~~~~~
Mini Turtle Pincushion (4″)
INSTRUCTIONS
Material
1. Fabric W (shells) – Cotton 8″ x 6″
2. Fabric X (body) – Felt 4″ x 7″
3. Fabric Y (Hexagons) – Cotton 4″ x 8″
4. Fabric Z (center Hexagons) – Cotton 2″ x 4″
5. Batting (5mm loft) or poly-sponge – 4.5″ x 3.5″
6. Poly-fill – A handful
7. 3mm black color beads x 2
8. Needle and matching color threads
9. Cardboard 3.5″ x 3.5″
10. Scissor
Seam allowance
1. 3/8″ on all cotton fabric
2. No seam allowance needed for felt material except the side mark with *, leave a 1/4″ seam allowance on * side
3. No seam allowance needed for batting
Instructions
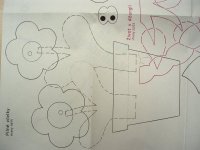
1. Cut fabric W, X, Y, Z & iron-on poly-sponge according to the patterns and correct seam allowances.
2. Baste batting on the wrong side of each fabric on pattern A & B, set aside.
Top & Bottom Shell
3. Prepare 10 pieces of pattern H cupboards for hexagon quilting. Baste the fabric Y & Z onto the cupboards accordingly. Stitch them up to form the pattern on the turtle back. Iron to set the shape. Remove the cupboard and get ready for next step. Please refer to the tutorial of
basic hexagon quilting for this English paper piecing technique.
4. Slip stitch the hexagon quilt block onto the right-side of pattern A that has batting, follow the outer line of the quilt. Place another piece of pattern A, right-side facing each other and sew.
5. Clip curve near to the stitching line at a spacing of about 1cm.
6. Make a cut of about 1 1/4″ length at the center of pattern A that without hexagon quilts. Use this opening to turn the right-side out.
7. Smooth out the curve. Mend the opening, iron the work and set aside.
8. Sew pattern B exactly the same way as pattern A but without the hexagon quilt block.
9. Top stitch the decoration lines for both pattern A & B respectively. Set aside.
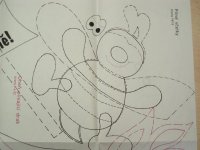
Body
10. Place 2 pieces of pattern C (front flipper) with wrong-side facing each other. Hand sew the side (except *) with blanket stitch. Stuff with poly-fill. Do the same for another front flipper, and pattern D, E, F, & G. Don’t stuff pattern G. Sew the beads onto the face to form eyes.
11. Hand sew pattern B with blanket stitch, join the head, tail and limbs at the respective markings. Leave a length of 3cm for poly-fill stuffing before complete the round.
Joining Up
12. Sandwich the top and bottom shells to the body, hand sew the shell perimeter to the body.
~Done~
~~~~~~~~~~~~~~~~~~~~~~~~~~~~~~~~~~~~~~~~~~~~~~~~~~~~~~
COMBO Turtle Pincushion With Storage Compartment (8″)
The material is similar to the felt version, except:
1. Enlarge the pattern to 200%, and hence the material for this combo version
2. Change the felt material to cotton fabric.
3. Seam allowance is 10mm or 3/8″ for all patterns excluding batting
4. 1/2″ diameter magnet, 3 pcs. 2 for flippers and 1 for body
5. 5mm dia. black beads, 2 pcs. (for eyes)
6. Short length of elastic band, 1′.
7. Buttons, 3/8″ diameter, 4 pcs.
8. Felt for scissor and needle compartment
9. Bean for stuffing (optional)
 The Body
Cut out all fabrics according to patterns and seam allowances.
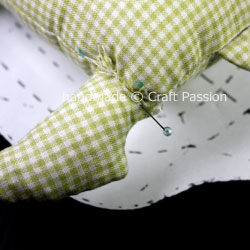
Sew the head, flippers and tail, clip curve and turn them inside out (like those on the right).
Pin the tail to the body with the tip pointing towards to the head. Unlike the 4″ mini Pincushion, Sew the body without attaching any flippers or head, but just the tail.
Insert a magnet into each front flipper.

The magnet should be opposite in polarity so that they can attract to each other.

I like my turtle to have some weight, so I put in some beans to the back flippers. Cover it with poly-fill at the opening.
Otherwise, just the poly-fill.

Stuff the head with poly-fill. Sew the beads to make eyes. Pull the thread tight to set the eyes into the head.
Embroidery branch stitch for the mouth.

Snip a small vertical line of about 1.5″ at the center of the body, turn the fabric right side out from this opening. Stuff in poly-fill and mend the opening. If you have fray checks, put a few drops. The opening will be covered by the top shell, no one will see the “scar”.

Slip Stitch the head to the body. Try to tilt the head up and sew a few stitches on the top of the neck to make it stay in position.
Place the body on top of the shell paper pattern, pin the flippers at the correct positions. Sew them in place after you are absolutely satisfy with where they are.
 Shell
Shell
Baste the batting on the wrong side of the shells. Place another piece of it’s fabric at the bottom with right side facing each other. Sew around the line and clip near the curve.
Prepare the
hexagon quilt block. Iron to set the shape, remove the basting stitches and cardboards.

Snip a vertical line on the shell to turn the fabric right side out. Smooth out the curve, mend the opening. Press.
Baste the hexagon quilt block on top of the shell and slip stitch along the block.

Top stitch as per pattern. Removed the basting stitches.

Stitch the top shell to the body.

Repeat the same step for turning the fabric right side out, try to minimize the opening to about 1 1/4″. The big green hexagon is 400% of the original pattern, slip stitch it on the bottom shell to cover the “mending scar”. Top stitch as per pattern.
Slip stitch a hexagon while place a magnet in it.

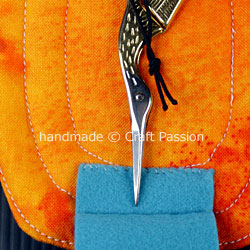
Position a small scissor on inner-side of the bottom shell. Cut a short length (about 4″) of elastic band, tie a knot and sew it at the middle of the shell.
Sew a button in the finger hole to tie your scissor in place.
Prepare a felt to make a pocket for the scissor. Fold the top and bottom edges and sew. Allowing more overlapping for the bottom, we are going to use it to cushion the sharp shear tip.

open up the bottom fold of the pocket and stitch the edge to the inner-side of the bottom shell as shown.

Sew the side with blanket stitch. The pocket to hold a scissor is done.

Cut another piece of felt, fold it to halve and sew it on the bottom body.
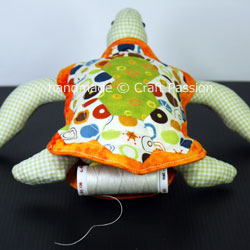
Make another elastic band and button set to hold the thread spool at the tail area.
Sew 2 loops of elastic band at each side of the body.

Place the bottom shell to the body and mark the position of the buttons for the elastic loops. Sew button and fasten off the bottom shell to the body.

The rear view of the turtle with a spool of thread at the tail…

The COMBO Turtle Pincushion is now ready for action!!!!
Could you please suggest a name for it???? Combo? Mambo? Orangy? etc…. Please I need a name for her (or him?), I am not good in name…. Look at me, I can’t even decide which sex to give it? Female of Male?
 6a00d8341cc08553ef015436d46e3a970c-800wi.jpg16.7 KB · Olvasás: 156
 6a00d8341cc08553ef015436d46f1f970c-800wi.jpg30.1 KB · Olvasás: 141
 6a00d8341cc08553ef01539300d5d2970b-800wi.jpg32.8 KB · Olvasás: 134
 6a00d8341cc08553ef01539300d7d2970b-800wi.jpg40.7 KB · Olvasás: 144
 6a00d8341cc08553ef01539300d69c970b-800wi.jpg37.3 KB · Olvasás: 139


")